Nowadays, a big part of running a business is having a web presence, and that means building a business website. It serves as your online base, informing your audience of your branding and value proposition, as well as marketing your products and services and driving sales.
Once you’ve decided on building a website for your business, you must then plan each step of the process. Building a business website is an investment of your money, time, and effort, so you’ll want to make sure that you get it right the first time. You want to end up with a business website that not only works, but actually brings you a boost in revenue.
Let’s take a look at the steps to set up a business website, from planning and preparation to launching it.
Why You Should Build a Business Website
You can’t really run a business nowadays, even a local brick-and-mortar one, and expect growth without a web presence. That’s why many businesses nowadays are on social media to be able to engage with their customers and acquire new ones.
But social media pages aren’t enough to truly have web presence as you’re not in total control of the platform. You still need to have your own, and that’s why having a business website is necessary as it allows you to present your business, post your own content, and even create your own online store through it.
Web design has advanced to the point that anyone can build their own website quickly and easily with a few tools. We shall now take a look at how to set up a business website.
How to Build a Business Website
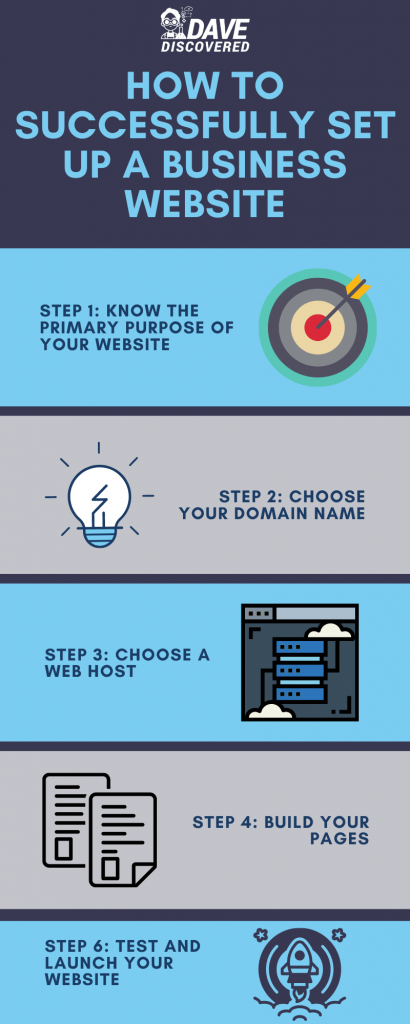
Step 1: Know the primary purpose of your website
A business website is mostly there to provide general information about your business to visitors, showing what your brand is about, what you sell, and what kind of value you offer to your customers. That information should be easy to find in your website, namely on your landing page and in your navigation.
However, the usefulness of a business website does not stop there. You can have things like a live web chat widget right there to take inquiries. Your customers should be able to contact you easily, either through that chat widget or through contact details that should be easily found on your website.
Of course, your business website should be able to be transformed into an online store whenever you wish. By turning your website into an online storefront, you make your website gather revenue directly through sales, thus extending the usefulness of your website even further.
This is a typical roadmap for most business websites, and it is a pretty solid framework to work from. However, not every business is the same, so your business may not take the same road. However your business website ends up, make sure that you know what purpose your website is supposed to serve before you build it.
Step 2: Choose your domain name
Your domain name is the URL address of your website, thus it’s how people find it online. It’s the address that you’ll share with both current and potential customers on social media and elsewhere. Typically, it should contain the name of your brand while keeping it as short and simple as possible, not making use of any abbreviations, acronyms, and numbers whenever possible to avoid confusion.
You then decide on what your top-level domain (TLD) is, whether it’s a .com, .net, .biz, or so on. You can go the traditional route and just get a .com domain, or you can go for a more non-traditional TLD like a location-based one like .us, .nyc, or so on. It can also be the name of the type of business you run, like .marketing, .agency, .law, .store, or so on. If you’re unable to decide on it, there’s nothing wrong with a regular .com domain.
Register that domain name with a domain registrar like GoDaddy, which has pretty affordable prices for domains. You can avail of a domain name for cheap with GoDaddy, especially if you can find a promo code.
Step 3: Choose a web host
Once you have your domain name, it’s time to establish the place that domain name will point to. That means getting web hosting to contain your actual website. It’s important to choose your hosting service carefully as it can be a massive headache if it turns out the hosting you bought for your website doesn’t fit it at all. You’ll then be stuck with it for at least a whole year or so.
There are two different kinds of hosting to choose from, which are shared hosting and dedicated hosting. Shared hosting puts your website in a server that’s populated by other websites as well, so it means you share the bandwidth for that server with your “neighbors.” The main advantage of shared hosting is that it’s a lot cheaper, but it obviously has less space and bandwidth, so it’s not good if your website gets tons of visitors per month.
If you do get at least tens of thousands of visitors to your website per month, then you’ll want to get dedicated hosting. It’ll be more expensive, but it’ll also be more scalable as your business grows and brings more eyes to your brand. It also gives you the space to host your own online store, which will bring in more revenue.
You can start with a hosting service like Bluehost, which lets you host a WordPress website easily and affordably. WordPress is the most popular content management system on the internet due to its convenience and ease of use. It lets you post content, install plugins for more functionality, and even turn it into an online store very easily.
Bluehost has specialized WordPress hosting that automatically installs WordPress for you so that you don’t have to do it yourself and it configures your website for you. All you have to do is give it a name, choose a theme, and start posting content right away.
If you want to build your website yourself, you’ll find the Bluehost Website Builder to be a convenient way to do just that. As your business grows, you can then opt for higher plans to be able to do more with it and accommodate more views.
Step 4: Build your pages
A good website is more than just a single landing page. You’ll want to create multiple pages that showcase different aspects of your business. You can have a page that details your products and services, then another that has your contact details, and so on. You may also want to have a blog section for company news and updates, guides, and other helpful content.
Each of these pages should have a call-to-action that leads them to learn more about your products and services, sign up for a promotion or program, contact your business for more info, buy a product or service, or so on. As much as possible, there shouldn’t be a dead end in your website; every page should lead to a conversion—turning a visitor into a paying customer.
Your business website will need a contact page so that your customers can find out how to contact you. Include your phone number, email address, physical address if you have one, your social media business pages, and wherever else your business may be reached.
Of course, you’ll also need an about page that describes your business, your unique selling proposition, your staff, and so on. It should give visitors a good idea on what your brand is, what your business is selling, what sets your brand apart from the rest, the people behind the brand, and so on.
Speaking of your brand, you should already have a logo and branding identity for your business. If you don’t have one yet, it’s time to sit down and come up with one that you can stick with. If you don’t have the skills, you may hire a graphic designer to create a logo and brand identity according to your needs. You can use it for not just your website, but also your social media profiles, business cards, signs, and so on.
Whenever possible, avoid using stock photos. They look generic and mediocre, which will not help your business stand out from the pack. Whenever possible, take your own photos of your business establishment, as well as your staff, so you can show the faces behind your brand.
As for product pages, invest in taking high quality photos of your products and services. High quality images do help in promoting sales, so it certainly helps to put time and money into them. You can use them for your social media as well, so make sure to get as much use out of them whenever possible.
Avoid stock photos. Tacky stock photography is the quickest way to turn a great site into a mediocre one. If you’re looking for photos to use on your page, it’s best to use a picture of your actual team or office.
Step 5: Set up your online store and payment system (if applicable)
If you happen to be taking that extra step into ecommerce, then you should consider your options in how to put up your online store. For WordPress websites, you can install the WooCommerce plugin to turn your website into an online store easily. You can then add your product pages, making use of those aforementioned high-quality images.
Also set up your payment processing solution. The most readily available payment system out there is PayPal, but you’ll also want to have other payment options as well to encourage as many potential customers to buy from your online store.
Step 6: Test and launch your website
Before you announce the launch of your website to the world through your social media, you should make sure your website works and looks right in all the major browsers. Make sure to click through each page to make sure everything works.
Also view your website on mobile devices. If you’re using a WordPress theme with responsive design, then you should have no problems with your website looking right on phones and tablets. Google especially likes websites with designs that prioritize mobile devices, as well as fast-loading websites for good search engine optimization.
You’ll also want to get Google Analytics linked with your website to be able to measure real-time performance. Google Analytics should have instructions on how to do this, and getting that out of the way before you launch your site will save you a lot of trouble and help you understand how you can expand your web presence later on.
Once you’re ready, announce your website launch on your social media pages in Facebook, Twitter, LinkedIn, and so on. Let your audience know that you now have a website where everything that happens in your business will be centralized.
Afterwards, take time in learning about search engine optimization, content marketing, and so on. From here, your main job for your website is to get more people to visit it. The more people go to your website and actually use it, the more it helps your business grow.